I detailed in my first post about this car the state of the interior when I got it. For the most part, all of it has been sorted out. But a smell remained. Most days it wasn’t bad, but some days it would hit me in the face. In addition to the odor, it also felt a little humid. The air just felt like it had moisture in it. Something had to be done.
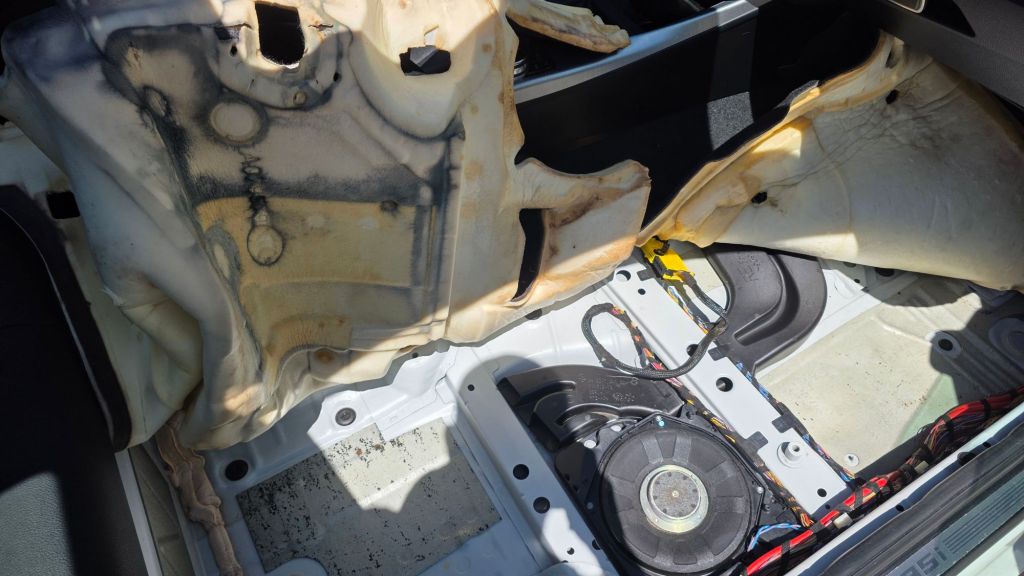
As a refresher, here is what the bottom of the rear seat looked like when I first got the car:

Obviously water came in. That seat has since been replaced with a newer one that has zero mold on it by the way. The seat in the photo is probably sitting at a landfill somewhere. Or it is destroyed by now. Either way, it’s out of my car and life.
The Drains
But the musty odor was still there so the hunt was back on. I started with double checking the drains in the car. I found that the front ones were clogged pretty good. Mosty likely they were the source of the problem I believe. The rear sunroof drains flowed freely, no signs of clogging or leaking. I still poured a little soapy water down them to help flush out any dirt that may be in there for good meausre. A gentle massage of the front drain exits freed them up and the water I poured in to test them came rushing out. I tested the fronts again with soapy water and they now flowed like they should. Nice and quick.
I moved to the HVAC system and used a foaming A/C evaporater cleaner up the A/C drain line to make sure that was nice and clean. It did make the A/C, and the car itself, smell much nicer for two days but the smell returned. The A/C drain also didn’t seem to be clogged at all.
Another place these cars like to leak is the vapor barrier on the doors. I checked those and they were nice and tight. The small door drain holes were also clean and clear but I used a small drain brush to give them a once over while I was there.
My last adventure in leak finding was the cowl drains under the windshield. I cleaned out a lot of leaves but did not find any signs of clogs or leaks.
The Carpet
So now I had checked and cleaned all the usual suspected water ingress sites. The carpet was bone dry and I could not find any wet spots or signs of recent water leakage. So I decided it was time to check the carpet.
I started on the passenger side and pulled the seat out and started removing some trim pieces. When I lifted the carpet the first thing I noticed was it felt heavier than expected. As I lifted further, I noticed water dripping out. The foam backing was like a sponge, filled with water. Welp, source of the odor found.
Good news is that it was all clear water. No disgusting bacteria stew. I mean, it wasn’t anything I wanted to get in my mouth but at least it wasn’t slimy. I cheked the driver side and thankfully it was all dry. No water, no discoloration in the foam. So that was good news.
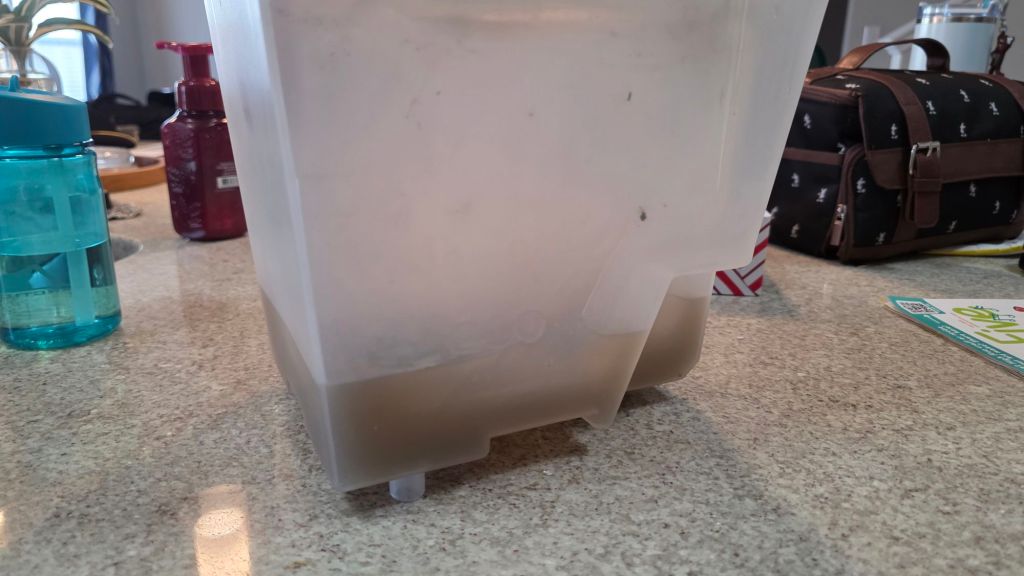
That picture shows it after using a wet-vac to extract water from the floorboard. The subwoofer had a little bit of water in it so I removed it, dried it out and used electrical connection cleaner on it as the plug showed a small amount of corrosion. Just for good measure I sprayed some on the other electrical connectors down there too even if they were still dry.
I spent about half an hour squeezeing water out of the padding and sucking it back up. The front section wasn’t bad, it was moist at best thankfully. The rear is were all the water resided. After getting as much out as I could I tried to remove the center console so I could just remove the carpet all together. However I could not get the console out. It was fully unbolted and free, but I could not manage to get it to clear the hand brake and manual shifter. So I bolted it all back up, flipped the carpet over the console as shown in the photo and parked the car outside in the sun for two and a half hours with the sunroof open.
It was a very nice 75 degree day which helped but I did wish it was a bit warmer out. Still, the time spent in the sun helped dry out most of the foam. With the carpet flipped up the water left in the foam settled at the bottom where the fold was. So most of the foam had dried out but the bottom portion was now fully saturated again. So I squeezed out about half a cup more water and sucked that back up.
Finally I used a heat gun to dry out the foam padding. I just turned it on high and moved it all around the foam trying to get the water to evaporate. After another half hour the foam padding was warm and dry. I know I didn’t get every last drop out because I was not able to get all the carpet up but I did remove a lot. Using my hands to feel around, what was left was lightly damp and I plan to make another pass on this when I have more time. But for now I’m very happy with the amount of water I extracted.
Imagine that just sitting in a small section carpet. I did not measure it but when dumping it out I would estimate it at a cup and a half to two cups. That may not sound like much, but that can make all sorts of smells when trapped in foam.
I treated the foam and surrounding area with Moldex and then put the car back together. I parked it in the garage with the windows down to let it air out a bit more. Before going to bed I closed it all up just to see how it would smell in the morning after being enclosed.
The next day I got up, went downstairs and opened the door. Much better. There was just the tiniest hint of a residual odor but best of all the car did not feel humid inside. The air felt dry. And after a few seconds that odor faded and all I could smell was the leather conditioner I used on the seats. They were already out of the car yesterday as I was waiting for the carpet to dry, may as well take advantage and fully clean them right?
I’m not closing the chapter on this yet, but I feel like I have it all but resolved. In the future I’ll probably end up just replacing the carpet. But for now I’m pretty pleased with the results.
Thank you for reading, and I’ll see you in the next one.