It’s finally time to get the ND2 head on the car. Of course, before the new head can go in, the old one has to come out. This isn’t meant to be a step‑by‑step “how‑to,” but rather a walkthrough of what I did, along with some tips and tricks I picked up along the way. I’m writing with the assumption that if you’re tackling this job, you already have the mechanical know‑how to understand what you’re getting into. With that said—let’s get cracking.
I started by pulling the car into the garage, setting it on jack stands, and removing the wheels. From there, I moved on to the battery, air intake, and belts. But before diving into those, I slid some containers under the car and drained the fluids. Getting that done early gave them plenty of time to empty while I worked.
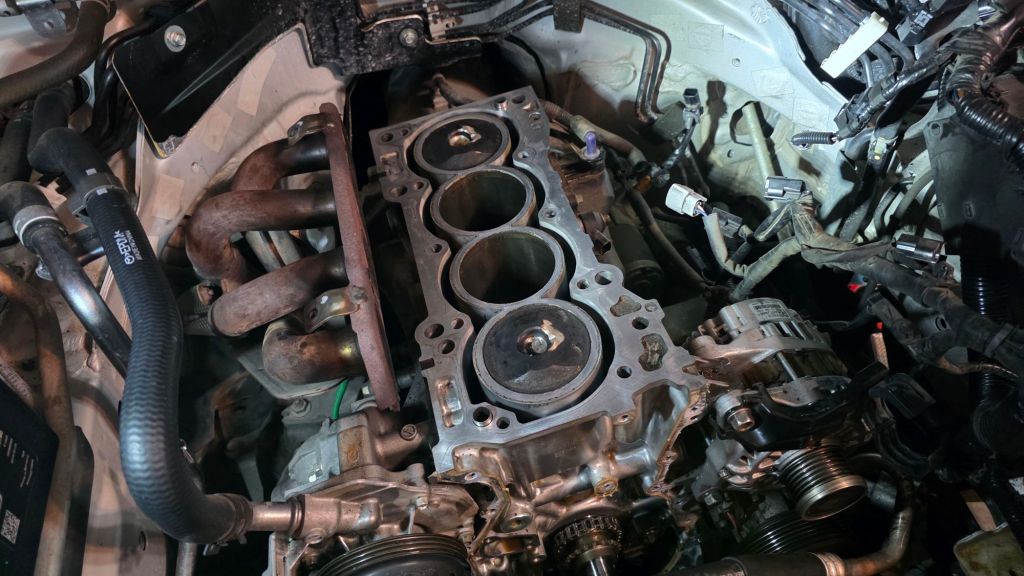
With the fluids draining, the airbox and battery out, and the belts and tensioner removed, it was time to face the intake manifold. And let me tell you—this was hands down the toughest part of the entire job. I’d call it the litmus test: if you can get the intake manifold off, you can swap cylinder heads.
The manifold throws a few curveballs. First, there’s the electrical connection tucked low near the firewall. Then there’s the cluster of clips securing wires to the manifold. Finally, you’ve got six bolts holding it to the engine. Five are right up top and easy to reach. The sixth, however, hides underneath, bolted directly to the engine block.
To get the final bolt out you have to take the driver side wheel off and the inner fender liner. That was the only way I could really get a socket on it. Using multiple extensions, a flex joint and patience, I was able to crack it loose. It took me over an hour to fully unbolt the manifold. Nearly all of that time was spent on the lower bolt and electrical connectors.
Pro Tip: Remove the alternator to aid in the removal and installation of the intake manifold. With the belt off, the alternator is only two bolts, a nut and one electrical connector to remove. Removing it allows you to shift the manifold towards the front of the car. This gives way more access to the electrical connectors and PCV hose. I didn’t realize this until I was trying to re-install it.

Next up was the exhaust manifold. This thing doesn’t give you much wiggle room. Even with all five nuts off, you can’t pull it far enough from the head to clear the studs. Normally, you’d have to crawl underneath and nearly unbolt the whole thing. Or—you can do what I did: pull the studs right out of the head. That little trick made both removal and installation way easier. One less obstacle in the way.
Now, I’ll admit, my car being rust‑free was a huge advantage here. If you’re working on something that’s lived its life in the rust belt, your mileage may vary.
With the manifold handled, I moved on to the valve cover gasket. No drama there—just a handful of bolts, and it pops right off

With the valve cover out of the way, my next battle was with the electrical connectors. The big cable running across the front of the engine had to go, and that meant unplugging four or five connectors clustered around the water pump. Some were accessible from up top, while others required crawling underneath and working by feel. Follow the wires, trust your hands, and it becomes pretty obvious which ones need to be disconnected. Once they were free, I unclipped the cable from its mounting points and swung the whole assembly over to the driver’s side—nice and tidy, as you can see in the photo above.
At this point, the only thing standing between me and pulling the head was the front timing cover. Here’s the catch: the timing cover bolts into the oil pan, and removing it breaks the RTV seal. Technically, you could try patching just that section of sealant, but I’m not sure how well that would work out. RTV works best as one continuous bead to avoid leaks. For now, I skipped dropping the oil pan and just pulled the timing cover.
One last thing before unbolting the timing cover—the crank pulley. It is VERY tight. I picked up a tool designed specifically to hold the pulley steady while I broke the bolt loose, and even then I needed another person.

I thought with this I could break it free myself. Nope! I had my wife hold the pulley in place with this tool and a long breaker bar. I used a 21MM socket on a breaker bar to put all of my might into it. With her holding the pulley in place and me pulling on my bar, it finally cracked loose.
Pro Tip: An aftermarket sway bar reduces the room available to get a socket and this tool on the crank pulley. Unbolting the sway bar from the mounts on the subframe lets you move it around and get the tools in place without much issue.
Removing the timing cover is just a matter of several bolts. You will want to keep note of which bolt goes where as there are various sizes of them.
With the bolts out, the next step was carefully prying the cover loose. Like the oil pan, it’s sealed with RTV, so it doesn’t just fall off. I wrapped a flathead screwdriver in a towel to avoid scoring the metal, worked a few spots until they started to separate, and then gave it a firm pull. Even then, it took some muscle. But once it was off, the head was finally ready to unbolt.
That’s when I hit my first tool snag—the head bolts require a T55 Torx bit. Of course, I had a T50 and a T60, but not the one I actually needed. Time for a quick run to the parts store, thankfully less than a mile away.
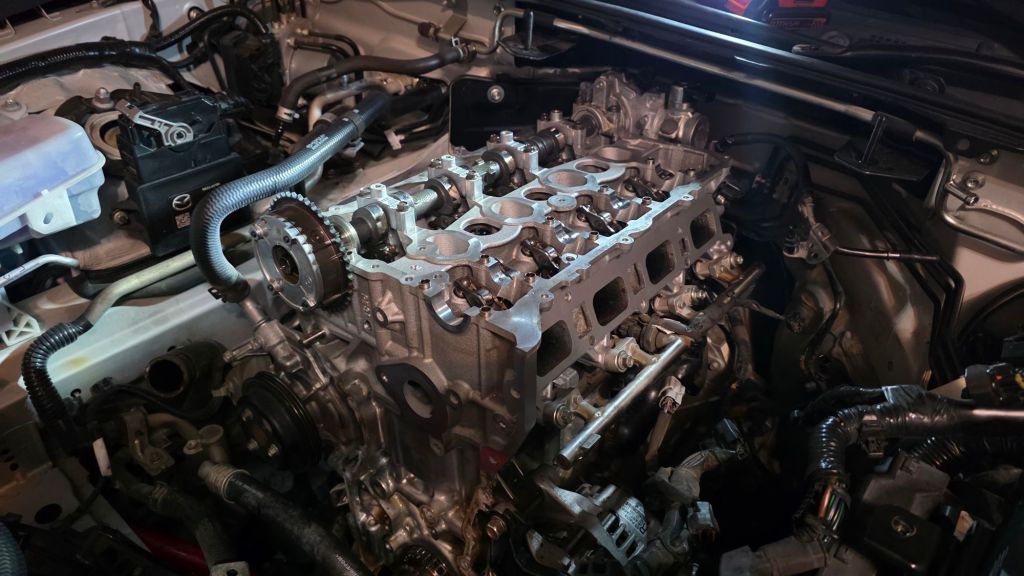
Back in the garage, I tackled the head bolts. The ones on the exhaust side were easy to reach, but the intake side bolts are under the cam. Before I could deal with those, the timing chain had to come off. That part was straightforward: remove the tensioner, and the chain loosens up. To give myself even more slack, I unbolted the timing chain guides. With those out, the chain lifted off fairly easily.
Finally, I pulled the intake cam, following the cam cap removal order from the shop manual.
Pro Tip: The shop manual and videos I’ve watched will have you remove the high pressure fuel pump and fuel injectors with the head still on the car. This is not necessary for this job. With the fuel line and electrical connectors unhooked, the fuel pump, line and injectors are completely contained on the head. You can remove the head with the fuel pump and injectors as one big assembly. It’s MUCH easier to remove them on a work bench.
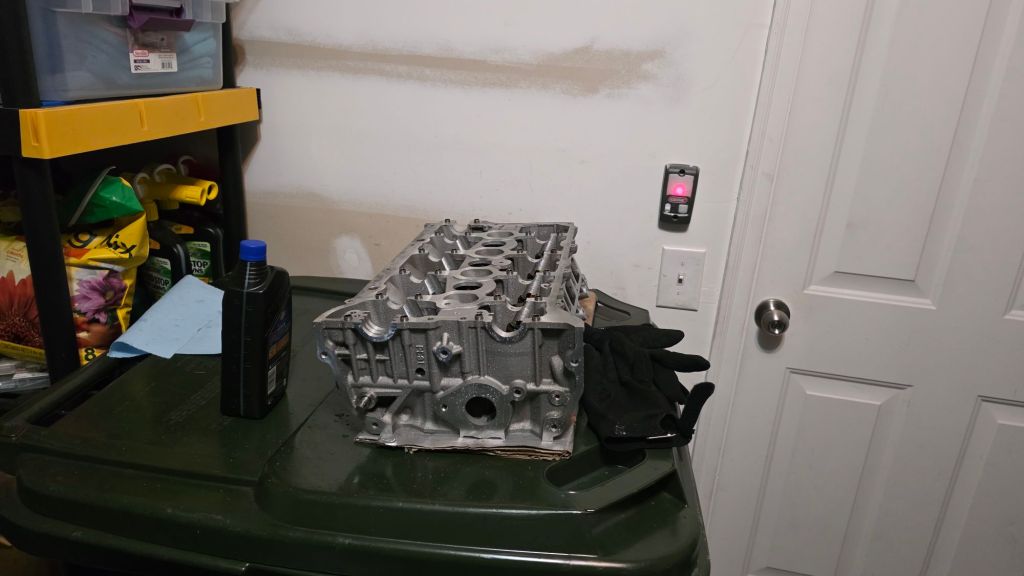
With the intake cam out the way, all head bolts were exposed. I followed the shop manuals removal order and then the head and fuel pump assembly lifted right off.

With the head off and getting prepped, I had a decision to make: which cams to run. Jan at SPS told me the ND2 cams would be fine, but the original video I watched insisted ND1 cams were required. That video warned that ND2 cams could cause piston‑to‑valve clearance issues, which is not ideal.
I must have swapped cams back and forth three or four times before settling on a decision. In the end, I stuck with ND1 cams. The forum thread and video that inspired this whole project used ND1 cams (technically aftermarket, but based on the ND1 profile), so I felt confident following that path.
For now, ND1 cams it is. I still have the ND2 cams on standby if I decide to experiment later. From what I could tell, the intake cams between ND1 and ND2 look nearly identical—the cam cards list the same duration, and my caliper measurements showed the same lift. Maybe there’s a subtle difference, but my “grassroots” measuring didn’t reveal one. The exhaust cam, however, seems to be where ND2 made its changes. That may be incorrect, these are just my observations from reading, measuring, and tinkering.
I bolted in the exhaust cam but left the intake cam off until the head was fully secured. Since I was running ND1 cams, I reused the ND1 rocker arms and lifters to keep wear patterns consistent. Even though there wasn’t any visible wear, it felt smarter to keep the original set together.
Next came the fuel system swap from the ND1 head to the ND2 head. On the workbench, this was straightforward: new seals and gaskets all around, except for the teflon seals. The manual says to replace them, but mine came out clean and undamaged. I forgot to order new ones, so I cleaned, lubricated, and reused them. They seated tightly in the new head, and since they’re easy to replace later, I wasn’t too worried.
Installing the fuel pump off the car was a huge advantage—it takes a bit of pressure to seat properly, and I can’t imagine trying to hold it in place while threading bolts with the head already installed.
But once that was on, it was time to clean up the block and lay down the new head gasket. That done, the head was seated and bolted down with new head bolts according to the order in the shop manual.
At this stage, it was the classic cliché: “installation is the reverse of removal.” Timing the cams was straightforward, but the real challenge came with retracting the tensioner and getting it back onto the block. With the timing chain guides already in place, the chain had just enough tension to make maneuvering the tensioner a tight squeeze. A little fiddling and patience, though, and it went back on. That’s when I turned my attention to the oil pan.
I picked up a cheap universal oil pan separator off Amazon, and to my surprise, it worked great. A few gentle taps with a hammer, followed by slow, deliberate rocking, sliced through the RTV seal easily. Of course, you’ll need to remove the mountain of 8mm bolts first—there are plenty of them. Once the pan was off, I cleaned the mounting surfaces and laid down fresh RTV on the timing chain cover. The cover has to go on before the oil pan, so I gave the RTV about five minutes to “set up” before mounting it. While I waited, I ran a wire brush through the bolt threads to clear out any old sealant. With two alignment dowels guiding the cover, lining it up was simple—just go slow and steady.
The oil pan was a little trickier since it doesn’t have alignment dowels. My trick was to press it against the back of the block and swing it upward like a hinge. It’ll make sense when you’re under there. Same RTV process, same bolt‑hole cleanup, and it went on smoothly.
I stretched this part of the job over a few days due to limited time for wrenching. The timing cover and oil pan were mounted about three days before I wrapped up the project, which gave the RTV plenty of time to cure before adding fluids. Whether that actually helps or not, I don’t know—but it gave me peace of mind.
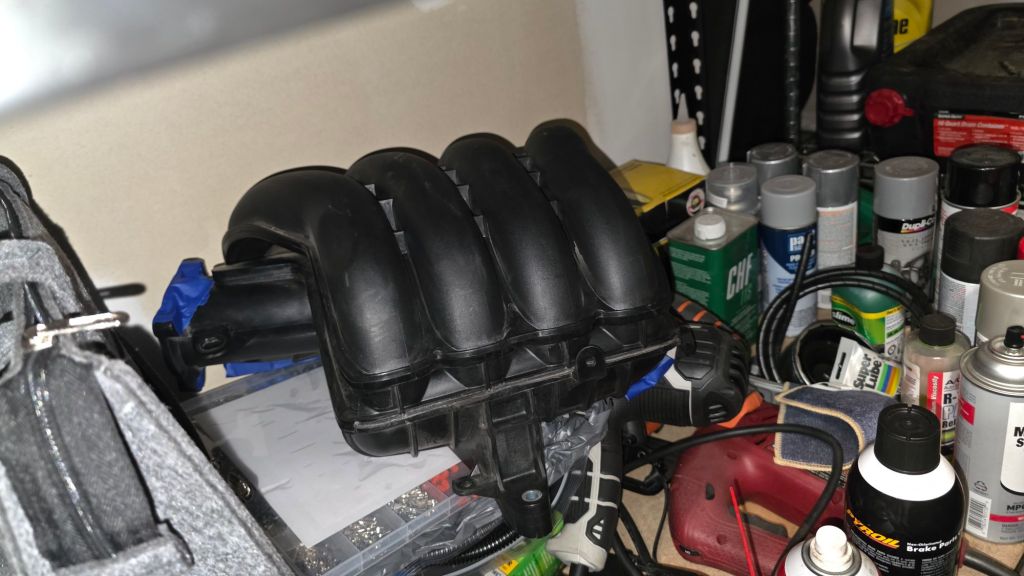
With those pieces in place, the last big hurdle was reinstalling the intake manifold. This is where I learned that pulling the alternator first makes life a lot easier. Before mounting the manifold, I had to reconnect all the electrical plugs for the fuel system and sensors—once the manifold is on, most of them are inaccessible. I spent about half an hour wrestling with it, trying to connect everything with the alternator still in place, but there just wasn’t enough room. Even from underneath, I couldn’t make it work.
Removing the alternator took less than five minutes with the belt already off, and it was a total game changer. Space was still tight, but now I had just enough clearance to slide the manifold forward, hook up all the connections, and then bolt it down.

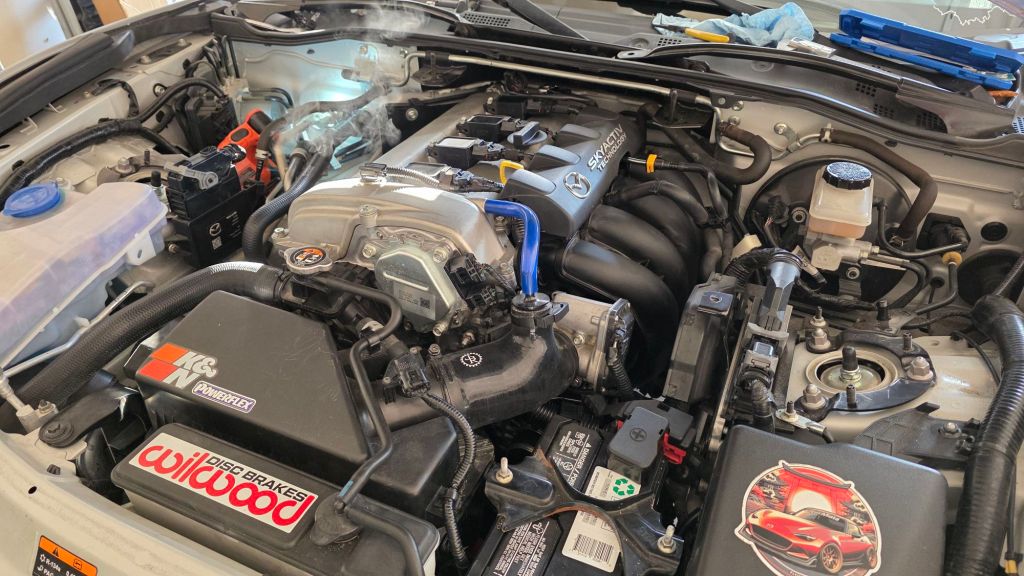
With the manifold on, there wasn’t much left to do. Connect some vacuum lines, the main fuel line and the rest of the electrical connectors. That done, it was time for belts. Next was reconnecting coolant hoses, the airbox and finally the battery. Finally, time to add oil and then the first crank. I didn’t put coolant in yet just in case something went wrong. It can run for a short time (very short) without coolant. I figure it’s one less fluid to drain if I needed to take it all apart again to fix something.
Time for the first crank. It fired right up! Even better, it ran without any piston‑to‑valve drama. I let it idle for about 15–20 seconds before shutting it down, then gave it a good 20 minutes to cool off before adding coolant. While waiting, I crawled underneath to bolt the sway bar back in place and reattach all the splash covers. With everything buttoned up, I tossed the wheels back on and dropped the car to the ground.
The only thing left was coolant. By this point it was late at night, so I filled the system, gave the lower radiator hose a few squeezes to burp out air bubbles, and topped it off. I let it sit overnight to naturally work out any remaining air.
The next morning, I topped it off again and fired the car up. As it warmed, I added coolant as needed until it reached operating temperature. Everything looked good—no leaks, no surprises. I shut it down, capped the radiator, and called that part done.
I did notice some smoke from the exhaust while it was heating up, but that was expected. I’d coated the head with WD‑40 during storage to prevent rust and keep the valve guides lubricated. It just needed time to burn off in the combustion chamber, and eventually it cleared.
With the engine bay checked over and no leaks in sight, it was time for the first drive. I kept it easy at first, listening for odd noises or smells. Everything felt solid. Back in the garage, I gave the bay another inspection and all seemed good.
Now for the real test. I wanted to push it in low‑to‑mid RPM under high load, since that’s when the intake cam timing fully advances. If there were piston‑to‑valve clearance issues, this would expose them quickly. I put the car through its paces, and it passed with flying colors—no strange noises, no sudden engine stops. Risky way to test, sure, but sometimes science demands a little…uh…stupidity?
Quick Notes & Observations
- Sound: The car definitely sounds different now. Even sticking with the ND1 cams, the tone is sportier.
- Volume: It’s slightly louder too. Bigger exhaust ports and valves mean more flow, so that tracks. I get why ND2 owners say the Cobalt exhaust can sound “boomy” compared to ND1 setups. Personally, I think it sounds great—just a subtle but noticeable change.
- Torque: Off the line, the difference is obvious. From a stop, the car just wants to go. The combination of a better‑flowing head and higher compression gives it more punch down low.
- Mid‑Range: The mid‑range feels stronger, and the car really wants to rev. The Fab9 tune already helped cure the ND1’s tendency to “fall on its face” up high, but this swap takes it even further.
- Bottom line: it works. Would ND2 cams have worked too? Maybe. But I can confirm this setup works for me.
Current Setup
- ND1 block & pistons (147k miles)
- New OEM head gasket
- ND2 head (31k miles)
- ND2 intake manifold
- ND2 throttle body
- ND1 cams, rocker arms, and lifters
- ND1 high‑pressure fuel pump & injectors
- ND1 exhaust manifold
- New timing chain, guides, and tensioner (not required, but at 147k miles, why not?)
- Fab9 ND1 tune, calibrated from a data log (still the same tune I ran pre‑swap, not yet updated for the ND2 head)
- Every gasket on this engine has now replaced with new ones except for the teflon seals mentioned earlier and the rear main of course as I wasn’t working in that area.
Cost Breakdown
Total cost came in around $500. That’s not typical for this conversion—I bargain‑hunted for months to piece it together. The biggest win was the ND2 head: I scored it on eBay from a flood‑damaged car for $120. After hours of cleaning and inspection, it turned out all it needed was a deep clean. I got incredibly lucky on this find.
I basically lived on eBay, watching for ND2 intake manifolds and timing components, submitting offers until I snagged them cheap. I’d already been running the ND2 throttle body for months (about $60 when I bought it), so I didn’t include that in the total. You can reuse the ND1 throttle body if you want, but it’s 5mm smaller.
Final Thoughts
So yeah, ND2 head on an ND1 bottom end worked for me without swapping pistons. I stuck with ND1 cams, though ND2 cams might work. I didn’t test them. As always, your mileage may vary. Do this at your own risk. I was willing to gamble this engine due to it’s mileage to see if it could be done, and thankfully, it paid off.
And the big question: is the car faster? Well, it’s definitely not slower. It feels stronger off the line and keeps pulling, so I’d say yes. I don’t have measured runs to prove it yet, but the seat‑of‑the‑pants dyno says it’s an improvement. Next up: a header and fresh logs sent to Fab9 for another calibration.